Cara Berpikir dengan React
React dapat mengubah cara berpikir Anda tentang desain yang Anda lihat dan aplikasi yang Anda buat. Ketika Anda membuat antarmuka pengguna dengan React, pertama-tama Anda akan memecahnya menjadi beberapa bagian yang disebut dengan komponen. Kemudian, Anda akan mendeskripsikan state visual yang berbeda untuk setiap komponen Anda. Terakhir, Anda akan menghubungkan komponen-komponen Anda bersama-sama sehingga data mengalir melaluinya. Dalam tutorial ini, kami akan memandu Anda melalui proses berpikir untuk membangun tabel data produk yang dapat dicari dengan React.
Mulailah dengan sebuah rancang bangun
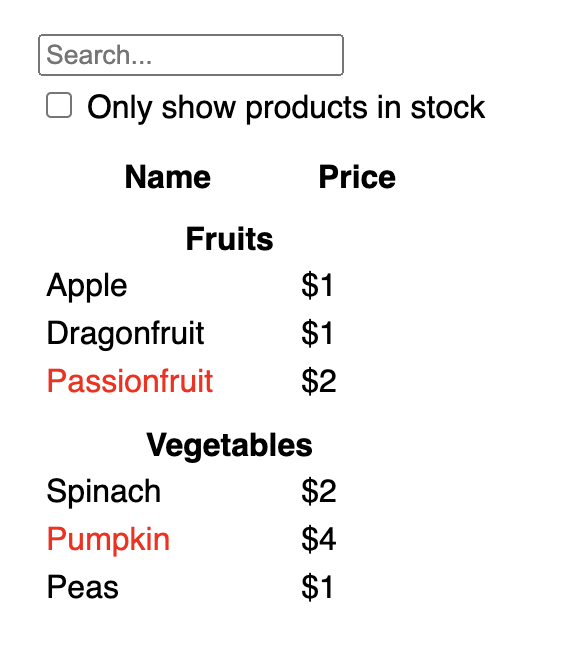
Bayangkan Anda sudah memiliki API JSON dan rancang bangun dari desainer.
API JSON mengembalikan beberapa data yang terlihat seperti ini:
[
  { category: "Fruits", price: "$1", stocked: true, name: "Apple" },
  { category: "Fruits", price: "$1", stocked: true, name: "Dragonfruit" },
  { category: "Fruits", price: "$2", stocked: false, name: "Passionfruit" },
  { category: "Vegetables", price: "$2", stocked: true, name: "Spinach" },
  { category: "Vegetables", price: "$4", stocked: false, name: "Pumpkin" },
  { category: "Vegetables", price: "$1", stocked: true, name: "Peas" }
]
Rancang bangun kita terlihat seperti ini:
Untuk mengimplementasikan antarmuka pengguna di React, Anda biasanya akan mengikuti lima langkah yang sama.
Langkah 1: Bagi antarmuka pengguna menjadi hierarki komponen
Mulailah dengan menggambar kotak-kotak di sekitar setiap komponen dan subkomponen dalam rancang bangun dan beri nama. Jika Anda bekerja dengan seorang desainer, mereka mungkin telah menamai komponen-komponen ini di alat bantu desain mereka. Tanyakan kepada mereka!
Tergantung pada latar belakang Anda, Anda dapat berpikir untuk membagi desain menjadi beberapa komponen dengan cara yang berbeda:
- Pemrograman—gunakan teknik yang sama untuk memutuskan apakah Anda harus membuat fungsi atau objek baru. Salah satu teknik tersebut adalah single responsibility principle, yaitu sebuah komponen idealnya hanya melakukan satu hal. Jika komponen tersebut berkembang, maka harus dipecah menjadi subkomponen yang lebih kecil.
- CSS—pertimbangkan untuk apa Anda akan membuat class selector. (Namun, komponen tidak terlalu terperinci.)
- Desain—pertimbangkan bagaimana Anda akan mengatur layer desain.
Jika JSON Anda terstruktur dengan baik, Anda akan sering menemukan bahwa JSON tersebut secara alami memetakan struktur komponen UI Anda. Hal ini karena UI dan model data sering kali memiliki arsitektur informasi yang sama—atau, bentuk yang sama. Pisahkan UI Anda menjadi beberapa komponen, di mana setiap komponen cocok dengan satu bagian dari model data Anda.
Terdapat lima komponen pada layar ini:
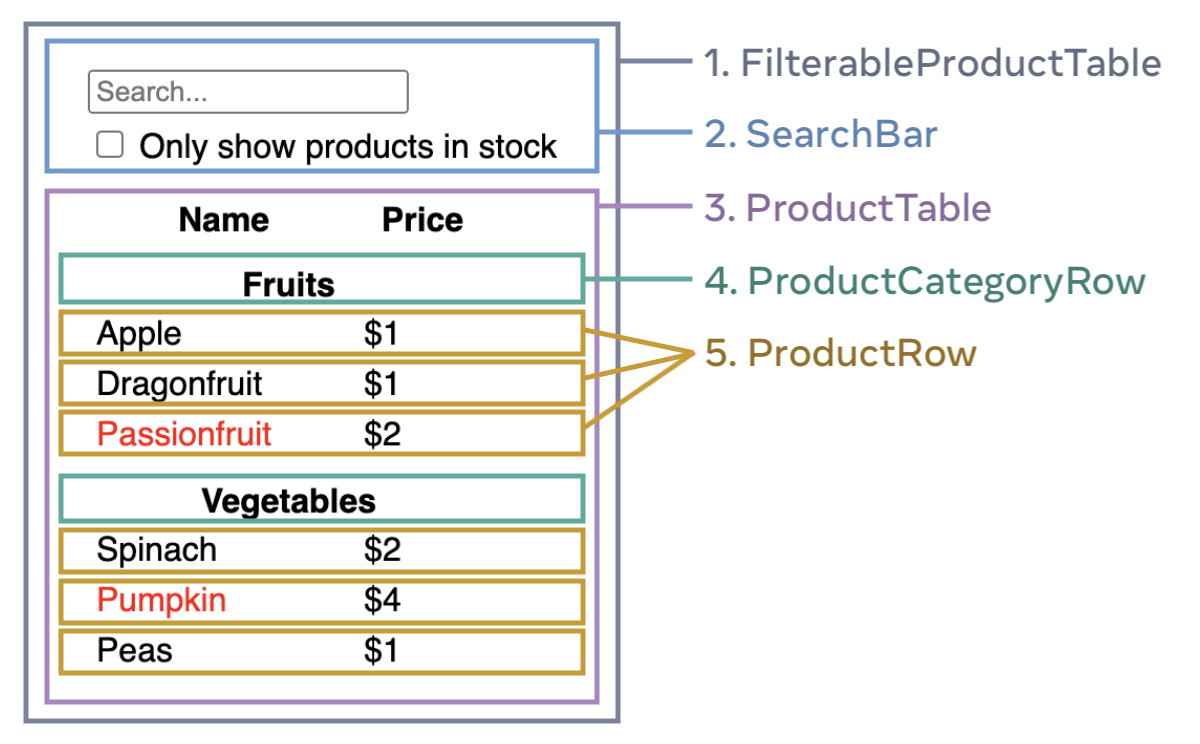
FilterableProductTable(abu-abu) berisi seluruh aplikasi.SearchBar(biru) menerima masukan dari pengguna.ProductTable(lavender) menampilkan dan memfilter list sesuai dengan masukan pengguna.ProductCategoryRow(hijau) menampilkan judul untuk setiap kategori.ProductRow(kuning) menampilkan baris untuk setiap produk.
Jika Anda melihat ProductTable (lavender), Anda akan melihat bahwa header tabel (yang berisi label “Name” dan “Price”) bukan merupakan komponennya sendiri. Ini adalah masalah preferensi, dan Anda dapat memilih salah satu. Dalam contoh ini, header tersebut merupakan bagian dari ProductTable karena muncul di dalam list ProductTable. Namun, jika header ini menjadi kompleks (misalnya, jika Anda menambahkan pengurutan), Anda dapat memindahkannya ke dalam komponen ProductTableHeader sendiri.
Setelah Anda mengidentifikasi komponen-komponen dalam rancang bangun, susunlah komponen-komponen tersebut ke dalam sebuah hirarki. Komponen yang muncul di dalam komponen lain dalam rancang bangun harus muncul sebagai anak dalam hierarki:
FilterableProductTableSearchBarProductTableProductCategoryRowProductRow
Langkah 2: Buat versi statis di React
Setelah Anda memiliki hierarki komponen, sekarang saatnya mengimplementasikan aplikasi Anda. Pendekatan yang paling mudah adalah membuat versi yang merender UI dari model data Anda tanpa menambahkan interaktivitas apa pun… untuk sementara! Sering kali lebih mudah untuk membuat versi statis terlebih dahulu dan menambahkan interaktivitas kemudian. Membangun versi statis membutuhkan banyak pengetikan dan tidak perlu berpikir, tetapi menambahkan interaktivitas membutuhkan banyak pemikiran dan tidak perlu banyak pengetikan.
Untuk membuat versi statis dari aplikasi Anda yang merender model data Anda, Anda perlu membuat komponen yang menggunakan kembali komponen lain dan mengirimkan data menggunakan props. Props adalah cara untuk mengoper data dari induk ke anak. (Jika Anda sudah terbiasa dengan konsep state, jangan gunakan state sama sekali untuk membangun versi statis ini. State hanya diperuntukkan bagi interaktivitas, yaitu data yang berubah seiring waktu. Karena ini adalah versi statis dari aplikasi, Anda tidak memerlukannya).
Anda bisa membangun “dari atas ke bawah” dengan memulai membangun komponen yang lebih tinggi dalam hierarki (seperti FilterableProductTable) atau “dari bawah ke atas” dengan bekerja dari komponen yang lebih rendah (seperti ProductRow). Dalam contoh yang lebih sederhana, biasanya lebih mudah untuk bekerja dari atas ke bawah, dan pada proyek yang lebih besar, lebih mudah untuk bekerja dari bawah ke atas.
function ProductCategoryRow({ category }) {
  return (
    <tr>
      <th colSpan="2">
        {category}
      </th>
    </tr>
  );
}

function ProductRow({ product }) {
  const name = product.stocked ? product.name :
    <span style={{ color: 'red' }}>
      {product.name}
    </span>;

  return (
    <tr>
      <td>{name}</td>
      <td>{product.price}</td>
    </tr>
  );
}

function ProductTable({ products }) {
  const rows = [];
  let lastCategory = null;

  products.forEach((product) => {
    if (product.category !== lastCategory) {
      rows.push(
        <ProductCategoryRow
          category={product.category}
          key={product.category} />
      );
    }
    rows.push(
      <ProductRow
        product={product}
        key={product.name} />
    );
    lastCategory = product.category;
  });

  return (
    <table>
      <thead>
        <tr>
          <th>Name</th>
          <th>Price</th>
        </tr>
      </thead>
      <tbody>{rows}</tbody>
    </table>
  );
}

function SearchBar() {
  return (
    <form>
      <input type="text" placeholder="Search..." />
      <label>
        <input type="checkbox" />
        {' '}
        Only show products in stock
      </label>
    </form>
  );
}

function FilterableProductTable({ products }) {
  return (
    <div>
      <SearchBar />
      <ProductTable products={products} />
    </div>
  );
}

const PRODUCTS = [
  {category: "Fruits", price: "$1", stocked: true, name: "Apple"},
  {category: "Fruits", price: "$1", stocked: true, name: "Dragonfruit"},
  {category: "Fruits", price: "$2", stocked: false, name: "Passionfruit"},
  {category: "Vegetables", price: "$2", stocked: true, name: "Spinach"},
  {category: "Vegetables", price: "$4", stocked: false, name: "Pumpkin"},
  {category: "Vegetables", price: "$1", stocked: true, name: "Peas"}
];

export default function App() {
  return <FilterableProductTable products={PRODUCTS} />;
}
(Jika kode ini terlihat menyeramkan, bacalah Quick Start terlebih dahulu!)
Setelah membuat komponen, Anda akan memiliki pustaka komponen yang dapat digunakan kembali untuk merender model data Anda. Karena ini adalah aplikasi statis, komponen-komponennya hanya akan mengembalikan JSX. Komponen di bagian atas hirarki (FilterableProductTable) akan mengambil model data Anda sebagai props. Ini disebut aliran data satu arah (one-way data flow) karena data mengalir turun dari komponen tingkat atas ke komponen di bagian bawah pohon.
Step 3: Find the minimal but complete representation of UI state
To make the UI interactive, you need to let users change your underlying data model. You will use state for this.
Think of state as the minimal set of changing data that your app needs to remember. The most important principle for structuring state is to keep it DRY (Don’t Repeat Yourself). Figure out the absolute minimal representation of the state your application needs and compute everything else on-demand. For example, if you’re building a shopping list, you can store the items as an array in state. If you want to also display the number of items in the list, don’t store the number of items as another state value—instead, read the length of your array.
Now think of all of the pieces of data in this example application:
- The original list of products
- The search text the user has entered
- The value of the checkbox
- The filtered list of products
Which of these are state? Identify the ones that are not:
- Does it remain unchanged over time? If so, it isn’t state.
- Is it passed in from a parent via props? If so, it isn’t state.
- Can you compute it based on existing state or props in your component? If so, it definitely isn’t state!
What’s left is probably state.
Let’s go through them one by one again:
- The original list of products is passed in as props, so it’s not state.
- The search text seems to be state since it changes over time and can’t be computed from anything.
- The value of the checkbox seems to be state since it changes over time and can’t be computed from anything.
- The filtered list of products isn’t state because it can be computed by taking the original list of products and filtering it according to the search text and value of the checkbox.
This means only the search text and the value of the checkbox are state! Nicely done!
Deep Dive
There are two types of “model” data in React: props and state. The two are very different:
- Props are like arguments you pass to a function. They let a parent component pass data to a child component and customize its appearance. For example, a
Formcan pass acolorprop to aButton. - State is like a component’s memory. It lets a component keep track of some information and change it in response to interactions. For example, a
Buttonmight keep track ofisHoveredstate.
Props and state are different, but they work together. A parent component will often keep some information in state (so that it can change it), and pass it down to child components as their props. It’s okay if the difference still feels fuzzy on the first read. It takes a bit of practice for it to really stick!
Step 4: Identify where your state should live
After identifying your app’s minimal state data, you need to identify which component is responsible for changing this state, or owns the state. Remember: React uses one-way data flow, passing data down the component hierarchy from parent to child component. It may not be immediately clear which component should own what state. This can be challenging if you’re new to this concept, but you can figure it out by following these steps!
For each piece of state in your application:
- Identify every component that renders something based on that state.
- Find their closest common parent component—a component above them all in the hierarchy.
- Decide where the state should live:
- Often, you can put the state directly into their common parent.
- You can also put the state into some component above their common parent.
- If you can’t find a component where it makes sense to own the state, create a new component solely for holding the state and add it somewhere in the hierarchy above the common parent component.
In the previous step, you found two pieces of state in this application: the search input text, and the value of the checkbox. In this example, they always appear together, so it makes sense to put them into the same place.
Now let’s run through our strategy for them:
- Identify components that use state:
ProductTableneeds to filter the product list based on that state (search text and checkbox value).SearchBarneeds to display that state (search text and checkbox value).
- Find their common parent: The first parent component both components share is
FilterableProductTable. - Decide where the state lives: We’ll keep the filter text and checked state values in
FilterableProductTable.
So the state values will live in FilterableProductTable.
Add state to the component with the useState() Hook. Hooks are special functions that let you “hook into” React. Add two state variables at the top of FilterableProductTable and specify their initial state:
function FilterableProductTable({ products }) {
  const [filterText, setFilterText] = useState('');
  const [inStockOnly, setInStockOnly] = useState(false);
Then, pass filterText and inStockOnly to ProductTable and SearchBar as props:
<div>
  <SearchBar
    filterText={filterText}
    inStockOnly={inStockOnly} />
  <ProductTable
    products={products}
    filterText={filterText}
    inStockOnly={inStockOnly} />
</div>
You can start seeing how your application will behave. Edit the filterText initial value from useState('') to useState('fruit') in the sandbox code below. You’ll see both the search input text and the table update:
import { useState } from 'react';

function FilterableProductTable({ products }) {
  const [filterText, setFilterText] = useState('');
  const [inStockOnly, setInStockOnly] = useState(false);

  return (
    <div>
      <SearchBar
        filterText={filterText}
        inStockOnly={inStockOnly} />
      <ProductTable
        products={products}
        filterText={filterText}
        inStockOnly={inStockOnly} />
    </div>
  );
}

function ProductCategoryRow({ category }) {
  return (
    <tr>
      <th colSpan="2">
        {category}
      </th>
    </tr>
  );
}

function ProductRow({ product }) {
  const name = product.stocked ? product.name :
    <span style={{ color: 'red' }}>
      {product.name}
    </span>;

  return (
    <tr>
      <td>{name}</td>
      <td>{product.price}</td>
    </tr>
  );
}

function ProductTable({ products, filterText, inStockOnly }) {
  const rows = [];
  let lastCategory = null;

  products.forEach((product) => {
    if (
      product.name.toLowerCase().indexOf(
        filterText.toLowerCase()
      ) === -1
    ) {
      return;
    }
    if (inStockOnly && !product.stocked) {
      return;
    }
    if (product.category !== lastCategory) {
      rows.push(
        <ProductCategoryRow
          category={product.category}
          key={product.category} />
      );
    }
    rows.push(
      <ProductRow
        product={product}
        key={product.name} />
    );
    lastCategory = product.category;
  });

  return (
    <table>
      <thead>
        <tr>
          <th>Name</th>
          <th>Price</th>
        </tr>
      </thead>
      <tbody>{rows}</tbody>
    </table>
  );
}

function SearchBar({ filterText, inStockOnly }) {
  return (
    <form>
      <input
        type="text"
        value={filterText}
        placeholder="Search..."/>
      <label>
        <input
          type="checkbox"
          checked={inStockOnly} />
        {' '}
        Only show products in stock
      </label>
    </form>
  );
}

const PRODUCTS = [
  {category: "Fruits", price: "$1", stocked: true, name: "Apple"},
  {category: "Fruits", price: "$1", stocked: true, name: "Dragonfruit"},
  {category: "Fruits", price: "$2", stocked: false, name: "Passionfruit"},
  {category: "Vegetables", price: "$2", stocked: true, name: "Spinach"},
  {category: "Vegetables", price: "$4", stocked: false, name: "Pumpkin"},
  {category: "Vegetables", price: "$1", stocked: true, name: "Peas"}
];

export default function App() {
  return <FilterableProductTable products={PRODUCTS} />;
}
Notice that editing the form doesn’t work yet. There is a console error in the sandbox above explaining why:
In the sandbox above, ProductTable and SearchBar read the filterText and inStockOnly props to render the table, the input, and the checkbox. For example, here is how SearchBar populates the input value:
function SearchBar({ filterText, inStockOnly }) {
  return (
    <form>
      <input
        type="text"
        value={filterText}
        placeholder="Search..."/>
However, you haven’t added any code to respond to the user actions like typing yet. This will be your final step.
Step 5: Add inverse data flow
Currently your app renders correctly with props and state flowing down the hierarchy. But to change the state according to user input, you will need to support data flowing the other way: the form components deep in the hierarchy need to update the state in FilterableProductTable.
React makes this data flow explicit, but it requires a little more typing than two-way data binding. If you try to type or check the box in the example above, you’ll see that React ignores your input. This is intentional. By writing <input value={filterText} />, you’ve set the value prop of the input to always be equal to the filterText state passed in from FilterableProductTable. Since filterText state is never set, the input never changes.
You want to make it so whenever the user changes the form inputs, the state updates to reflect those changes. The state is owned by FilterableProductTable, so only it can call setFilterText and setInStockOnly. To let SearchBar update the FilterableProductTable’s state, you need to pass these functions down to SearchBar:
function FilterableProductTable({ products }) {
  const [filterText, setFilterText] = useState('');
  const [inStockOnly, setInStockOnly] = useState(false);

  return (
    <div>
      <SearchBar
        filterText={filterText}
        inStockOnly={inStockOnly}
        onFilterTextChange={setFilterText}
        onInStockOnlyChange={setInStockOnly} />
Inside the SearchBar, you will add the onChange event handlers and set the parent state from them:
<input
  type="text"
  value={filterText}
  placeholder="Search..."
  onChange={(e) => onFilterTextChange(e.target.value)} />
Now the application fully works!
import { useState } from 'react';

function FilterableProductTable({ products }) {
  const [filterText, setFilterText] = useState('');
  const [inStockOnly, setInStockOnly] = useState(false);

  return (
    <div>
      <SearchBar
        filterText={filterText}
        inStockOnly={inStockOnly}
        onFilterTextChange={setFilterText}
        onInStockOnlyChange={setInStockOnly} />
      <ProductTable
        products={products}
        filterText={filterText}
        inStockOnly={inStockOnly} />
    </div>
  );
}

function ProductCategoryRow({ category }) {
  return (
    <tr>
      <th colSpan="2">
        {category}
      </th>
    </tr>
  );
}

function ProductRow({ product }) {
  const name = product.stocked ? product.name :
    <span style={{ color: 'red' }}>
      {product.name}
    </span>;

  return (
    <tr>
      <td>{name}</td>
      <td>{product.price}</td>
    </tr>
  );
}

function ProductTable({ products, filterText, inStockOnly }) {
  const rows = [];
  let lastCategory = null;

  products.forEach((product) => {
    if (
      product.name.toLowerCase().indexOf(
        filterText.toLowerCase()
      ) === -1
    ) {
      return;
    }
    if (inStockOnly && !product.stocked) {
      return;
    }
    if (product.category !== lastCategory) {
      rows.push(
        <ProductCategoryRow
          category={product.category}
          key={product.category} />
      );
    }
    rows.push(
      <ProductRow
        product={product}
        key={product.name} />
    );
    lastCategory = product.category;
  });

  return (
    <table>
      <thead>
        <tr>
          <th>Name</th>
          <th>Price</th>
        </tr>
      </thead>
      <tbody>{rows}</tbody>
    </table>
  );
}

function SearchBar({
  filterText,
  inStockOnly,
  onFilterTextChange,
  onInStockOnlyChange
}) {
  return (
    <form>
      <input
        type="text"
        value={filterText} placeholder="Search..."
        onChange={(e) => onFilterTextChange(e.target.value)} />
      <label>
        <input
          type="checkbox"
          checked={inStockOnly}
          onChange={(e) => onInStockOnlyChange(e.target.checked)} />
        {' '}
        Only show products in stock
      </label>
    </form>
  );
}

const PRODUCTS = [
  {category: "Fruits", price: "$1", stocked: true, name: "Apple"},
  {category: "Fruits", price: "$1", stocked: true, name: "Dragonfruit"},
  {category: "Fruits", price: "$2", stocked: false, name: "Passionfruit"},
  {category: "Vegetables", price: "$2", stocked: true, name: "Spinach"},
  {category: "Vegetables", price: "$4", stocked: false, name: "Pumpkin"},
  {category: "Vegetables", price: "$1", stocked: true, name: "Peas"}
];

export default function App() {
  return <FilterableProductTable products={PRODUCTS} />;
}
You can learn all about handling events and updating state in the Adding Interactivity section.
Where to go from here
This was a very brief introduction to how to think about building components and applications with React. You can start a React project right now or dive deeper on all the syntax used in this tutorial.